How to Plant and Harvest Grapes in Farming Simulator 2022
Well, dear friends. It’s time to learn more about grapes. This crop was introduced in Farming Simulator 22, so not everyone knows how to plant and harvest it. Let’s find out in our little guide.
More about grapes
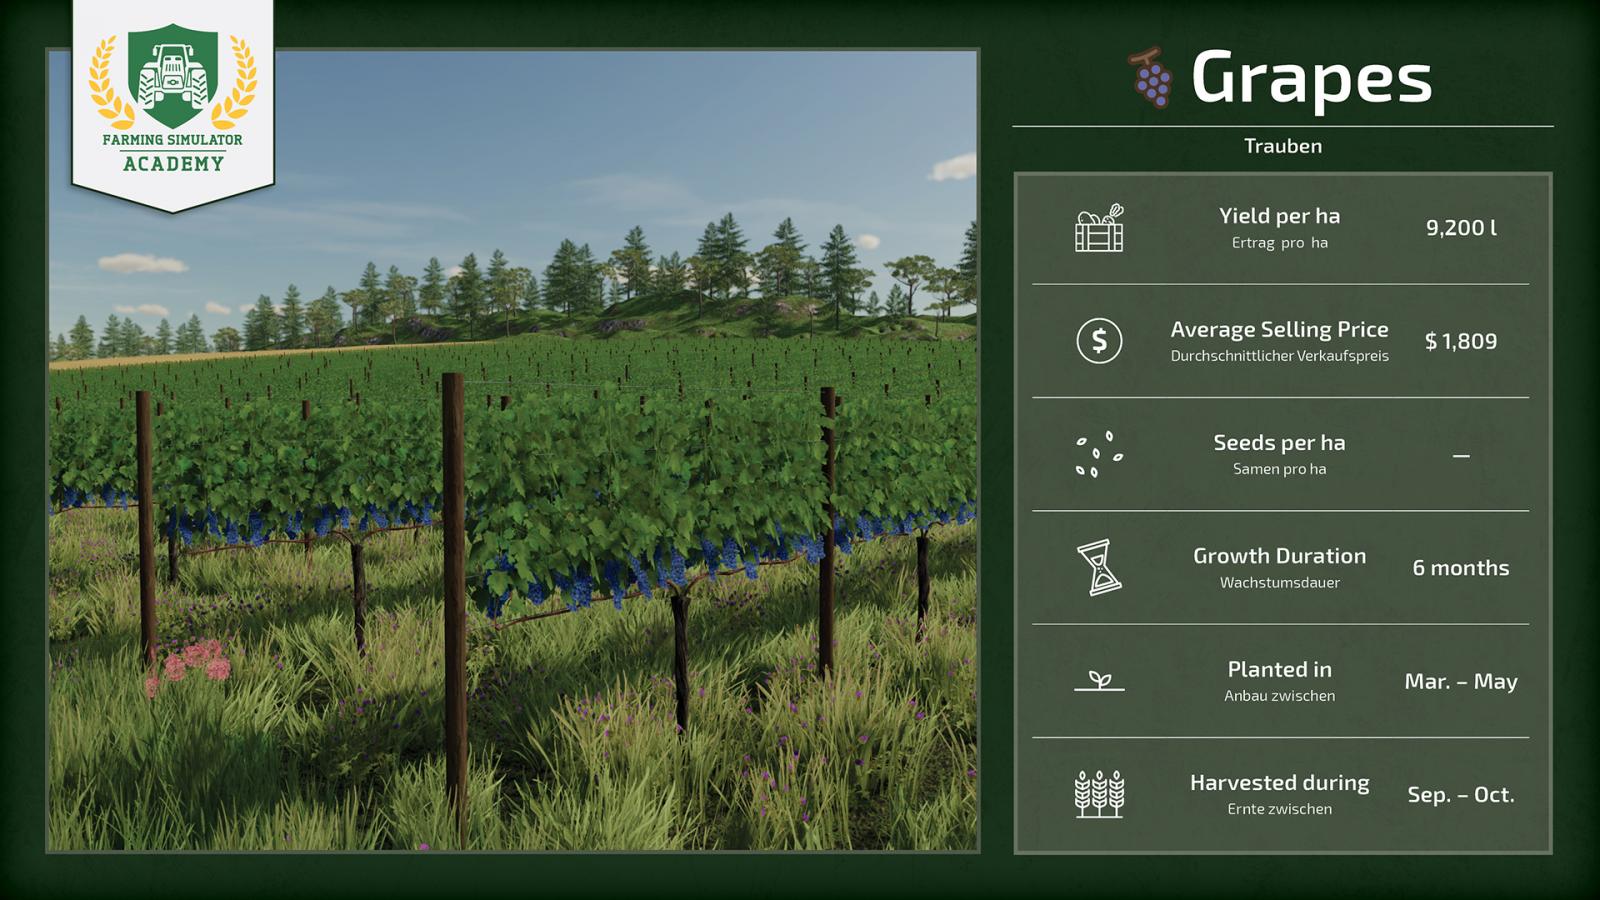
Let’s first figure out what is needed to grow grapes and what conditions must be met. Actually, it’s simpler than it seems. There must be a certain distance between the vines so the crop receives enough sunlight, air, and water. Naturally, this complicates the work significantly, but don’t worry – special equipment has been designed for vineyards to make your work easier. Let’s first talk about important details regarding grapes and what you will need for this crop:
- First of all, choose a good open area to create your vineyard. It doesn’t have to be perfectly flat, but pick a large open space.
- You will definitely need a good tractor capable of attaching special implements designed for vineyards.
- With a special deep cultivator, you can loosen the soil between the vines.
- Grass and weeds can grow between the vines, which need to be cut. This can be done using special mulchers.
- Don’t forget to use a special fertilizer spreader to increase the yield of this crop.
- When the harvest appears, you will need a special harvester to collect everything.
- After harvesting, you must prune the leaves (using special equipment, which we will discuss below). If you don’t do this, you won’t get a new harvest.
- And finally – a trailer. This is obvious, you need something to transport the harvest.
Recommended equipment for this crop
We’ve covered the basics, now let’s understand what specific equipment you should use for this crop. Keep in mind this is only a list of recommended equipment, but you have options and can use other machinery designed for this work.
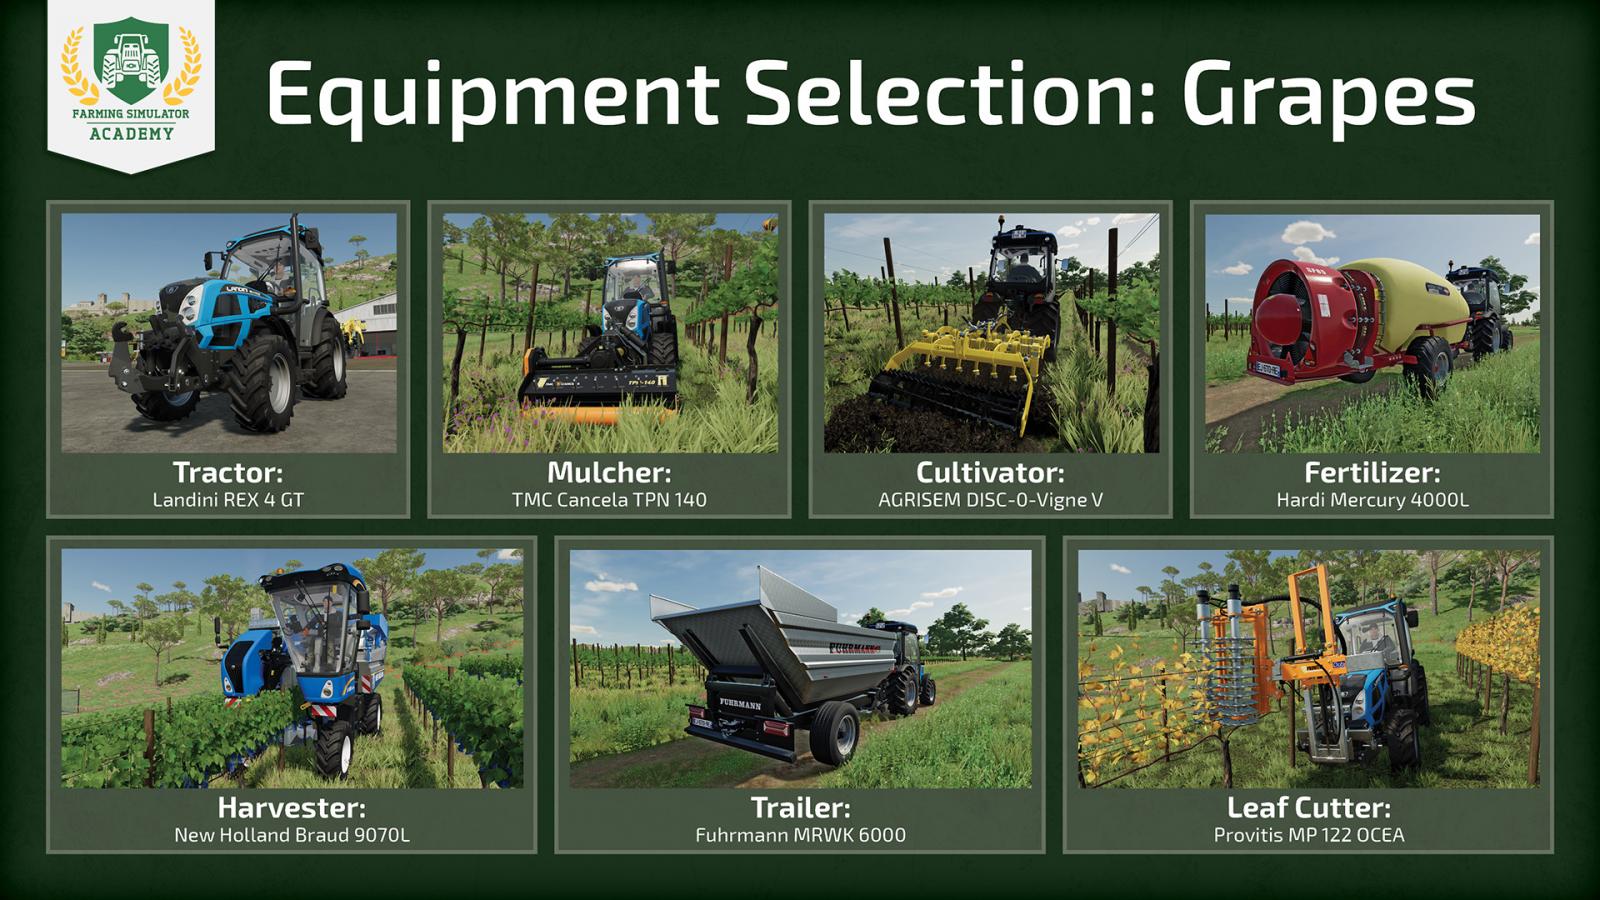
- A good tractor for vineyard work: Landini REX 4 GT;
- Among cultivators (deep cultivators), developers recommend the AGRISEM DISC-0-Vigne V;
- It’s time to buy a mulcher. Consider purchasing the TMC Cancela TPN 140;
- For harvesting, special harvesting machinery is required. Perhaps the Braud 9070L harvester will suit you?
- A good fertilizer spreader: Hardi Mercury 4000L;
- As mentioned above, a special leaf cutter is required to start getting a harvest again. The Provitis MP 122 OCEA model perfectly handles this task.
- And finally – a trailer. There is a wide selection here, but developers recommend starting with the Fuhrmann MRWK 6000.
Let’s get to work!
Having covered the basics and equipment, now it’s time to learn in detail how to plant grapevines, how to harvest, and generally how to manage this crop.
Step 1
Let’s start with placing the grapevines. First, choose a good spot that belongs to you. Now switch to construction mode, because this crop can only be placed this way. Keep in mind that grapevines should be planted fairly close to each other, but there must be a certain distance. You will soon get used to this, don’t worry, and construction mode shows everything as simply and clearly as possible, so the game itself will help you determine the correct spacing.
Go to the “Production” section, then to “Orchards” in construction mode. Select grapes, click anywhere on your land where you want to plant a vine. A post will be placed. Then simply drag a line across your farm and place a second post at the end – your vines will be planted between these two posts.
You can plant several such lines depending on your preferences. Keep in mind that if you play with seasonal growth, grapes can only be planted during a certain period: from March to May.
Step 2: mulching
Have you planted enough vines? Now move on to mulching. Attach your mulcher to the tractor and start removing grass between the rows of vines. Just quickly drive along each row and that’s it. This is an important process, be sure to do it.
Step 3: cultivation
The grapevines are planted quite close to each other, so using a regular cultivator is difficult. Take the deep cultivator you bought earlier and start working the soil between the vines. This will increase the amount of water and nutrients absorbed. Work row by row, but be very careful not to damage the vines. Approach the row, lower the deep cultivator, and start working.
Step 4: fertilizing
Finished soil cultivation? Now it’s time to apply fertilizer. Wait for the first growth stage, buy liquid fertilizer in the store (in big bags or pallets). You need to fill your fertilizer spreader in advance. To do this, attach the device to the tractor, approach the big bag of fertilizer, and start filling.
Done? Now head to your vineyard and carefully spread fertilizer between the rows. If you activate double fertilizer application rate on the device, you only need to drive along each row once, and everything will be fertilized 100%, cutting your work in half.
Step 5: harvesting
Great job, you have your first harvest. Now it’s time to collect it all, which is also a fairly labor-intensive process requiring special harvesting machinery. Drive your special harvester to the grapes, turn on the device, and start harvesting. Position the harvester in the center and carefully watch if the harvester is filling with grapes. If you positioned it correctly, standing right in the center and everything is collecting successfully – just drive through your vineyard and harvest all the grapes.
Step 6: selling the harvest
It’s time to sell your harvest. But first, drive up to your trailer (in our case, the trailer should be behind the harvester since unloading happens from the back). Start loading the harvest into the trailer and wait for the process to finish. That’s it, the grapes are unloaded into the trailer, move on!
Go to the price tab in the menu to see where it’s best to sell your harvest. If current prices don’t suit you – remember the production chains that allow you to make delicious juice or raisins from grapes, which sell for more than regular grapes. Make your choice and unload at the desired point.
Step 6: next harvest
Sold everything successfully? Don’t forget about your vineyards, as these vines can produce many more harvests. There is no need to plant new vines. Wait until the leaves turn yellow, then use the special leaf cutter. Attach this device to your tractor, drive between the vines, and cut the leaves to be able to get a harvest next year.
Done. Now you know how to place grapevines and harvest this crop in FS22!
Write the reason for your dislike:
If you do not explain the reason, but write an unintelligible text, you will be deprived of the opportunity to evaluate the mods, news and articles.
CancelRead more
Comments
Rules for writing comments. For non-compliance - ban!
Forbidden:- Use of profanity in messages
- Communication is not on the topic of the material
- Any insults of other users, including the author of the material
- Writing messages in whole or in part in CAPITAL letters (Caps Lock)
- Expressing your opinion without supporting it with arguments
- The use of links to third-party sites, or the use of images/videos/other content containing the aforementioned links

 Spintires: MudRunner
 SnowRunner
 Euro Truck Simulator 2
 American Truck Simulator
 Farming Simulator 2017
 Farming Simulator 2019
 Farming Simulator 2022
 BeamNG.drive
 City Car Driving
 Farming Simulator 20
 OMSI 2
 Assetto Corsa
 MXB
MXB