Farming Simulator 2022 8345
|
|
NEWS | ||
|
3.8K
|
0
0 |
||
29 Sep 2025 at 10:02
Farming Simulator Academy: FS22 Guides
For a newcomer to the Farming Simulator series, it’s not very easy. Farming Simulator 22 has many interesting mechanics, all kinds of machinery, engaging gameplay features, and all of this turns into a real nightmare for a beginner, because how do you distinguish cultivators, plows, and subsoilers from each other? How do you find out what they are for, and how to play FS22 correctly? We will answer all these questions for you on the FS22 FAQ page, where you will find a lot of useful information about the game: both translations of articles from ModHub and original content.
If you don’t know much about agriculture but want to learn how to play Farming Simulator 22 – our articles will help you and quickly turn you into a professional farmer.
General topics
You might wonder – what topics will the guides cover? You will find information about logging, seasonal cycles, the construction mode, features of various crops, and much more. All important game features, all the basics, mechanics, the use of machinery and tools, and much more. We intend to create a full tutorial so that even beginners can understand how to play FS22.
The most important thing is to provide information to beginners as clearly and thoroughly as possible, answer all their questions, and teach them how to play FS22. But sometimes even experienced players need to revisit the basics, so if you already have experience in agricultural work – some articles will still be interesting to you.
|
|
ARTICLE | ||
|
2.6K
|
0
0 |
||
29 Sep 2025 at 10:01
How to Sow and Harvest Grain Crops
Well, it's time to talk about cereal crops, and learn how to sow and harvest cereals in Farming Simulator 22, and how to sell them. By the way, everything said in this guide also applies to soybeans. Let's get started!
Which crops are considered cereals in FS22
Let's take a look at all the cereal crops in FS22. Below are all the cereal crops in the game (at the time of the game's release):
What you need to sow and harvest cereals
We have already explained where to start (https://stmods.ru/farming_simulator_2022/articles/s_chego_nachat_v_farming_simulator_2022/), and what equipment you will need. In that article, you will learn in more detail what equipment is required, but here is a brief overview. You will need the following devices:
Tractor. Obviously, the most important vehicle for a farmer.Cultivator.Seeder and the cereal seeds themselves.Fertilizer spreader, fertilizers, lime. Note that not all fertilizer spreaders can spread lime. Keep this in mind when purchasing.Weed removal device.Combine harvester, grain header.Trailer. After all, you need to transport the harvest.
Which equipment to choose for cereals
If you have no idea which equipment is best to take at the start – here is a list of recommended equipment from the developers of Farming Simulator 22 themselves. These machines will be available to you for free if you start the game on the easiest difficulty mode. You can choose equipment yourself, just watch your balance carefully to have enough for all purchases.
Tractor: John Deere 7810;Cultivator: RABE MR 250;Seeder: NORDSTEN NS 3030;Weed removal device: Einböck Aerostar-Exact 600;Combine harvester: DEUTZ-FAHR Topliner 4090 HTS + grain header 4090;Fertilizer spreader: BREDAL K105;Trailer: WELGER DK 115.
Keep in mind that some tools perform several tasks at once, so you can buy a multifunctional tool that, for example, will be both a seeder and a fertilizer spreader. Don’t forget that equipment can be rented if you don’t have enough money to buy it.
Let's get to work!
Have you bought everything you need and are ready to start? Let's begin. First, you should decide what you will sow. If seasonal cycles are enabled – it is recommended to start with canola, since the game starts in August, and this is the ideal season for canola.
Step 1: cultivate the field
As a rule, cereals require soil cultivation rather than plowing. Just get to the field, attach the cultivator, and start the cultivation process.
Step 2: sow the crop
First, fill the seeder. To do this, buy seeds, stand next to the pallets, press the refill button. Done! Now take your filled seeder and head to your field. Choose the crop you want to grow (in our case – rapeseed), go to the very corner, lower the seeder, turn it on, and start working.
Important note. Do not speed up time during this process, otherwise the crop will grow unevenly. If you decided to grow canola and there are beehives near the field – the yield will increase.
Step 3: apply fertilizers (and lime, if required)
Buy solid fertilizers in so-called big bags, connect the fertilizer spreader to your tractor, go to the big bags, and refill the spreader. Fertilizers increase yield, so this is an important process.
Now head to the field, turn on the fertilizer spreader, and start working. Once you finish, the field will be fertilized at 50%. If you want to achieve really good yields – after sowing, go over the field with the fertilizer spreader once more to reach 100%. With some types of manure spreaders, as well as with slurry, you can achieve 100% fertilization in one go.
Keep in mind that in some cases you may also need lime.
Step 4: remove weeds
It is very important to remove weeds in time, because the more they grow, the more work you will have to do later. At the initial stage, weeds can be removed with a regular weeding harvester, but if they have grown to the first stage – you will need to purchase a field sprayer separately, and at the start you don’t have much money, so be careful.
Another important point. If you have enabled the crop destruction setting – make sure you choose narrow tires for your tractor, otherwise you risk destroying most of your crop. If the setting is off – no problems.
Step 5: harvest the crop
As soon as the crop is ready for harvest – don’t waste time. Take the combine harvester, don’t forget to take the grain header. Lower the header, start harvesting. If you don’t harvest on time – the crop can dry out and become useless. However, this option can be turned off in the settings.
Step 6: sell the harvest
Starting cheap combines don’t have a large capacity, so the tank will fill up quite quickly. Approach your trailer, extend the combine’s pipe (so that the pipe is right above the trailer), and unload all the harvest into the trailer.
Now the most important part. Check if the selling price is acceptable. If not – you can take the harvest to a bunker for further storage and sell it later when the price is better. Don’t forget about production chains. If there are productions on the map – you can take the harvest there. Drive the trailer to the designated place and unload. That’s it!
Don’t forget that in the special menu you can check price fluctuations and decide whether it’s a good time to sell the harvest or better to wait. Try to sell everything at the best price possible, because you worked hard for it!
|
|
NEWS | ||
|
2.9K
|
0
0 |
||
29 Sep 2025 at 9:58
Farming Simulator 2022 Release and New Trailer
The official release of FS22 took place last night, and the game is now available on all platforms. Along with the game's release, the developers have prepared a new trailer, which you can watch below. Don't forget about our FS22 knowledge base.
Have you had a chance to play it yet?
Have you had a chance to play it yet?
|
|
ARTICLE | ||
|
2.7K
|
0
0 |
||
29 Sep 2025 at 9:00
How to Enable Flight Mode in Farming Simulator 2022
Want to become a real Superman and get the ability to fly in Farming Simulator 22? Actually, this is done very simply by changing a few settings. Let’s take a closer look at this issue. Follow the instructions, and you will easily be able to enable flight mode in FS22. In fact, this guide enables developer mode, which unlocks not only flight mode but also some other features.
First, go to the game folder. Path: Documents/My Games/FarmingSimulator22;Find the file named game.xml. You need to open this file with any text editor (for greater convenience, we recommend using Notepad++, but any text editor will do);Find the line < controls > false < / controls>, and change the value from False to True. It should look like < controls > true < / controls > . Save the changes in the file;Next, launch Farming Simulator 22 and start the game. While in the game, press the tilde key (the ~ key, located next to the 1 key on the keyboard), and press it again. The developer console will appear.While the console is open, press the TAB key until # gsPlayerFlightMod starts appearing in the console;Once you see this entry, press Enter;Almost done! Close the console (tilde key), then press the J key. Done!
Now you can fly in Farming Simulator 22. It’s also useful to know the flight controls. Press the Q key to ascend higher. The E key will help you descend. It’s all quite easy and simple!
|
|
ARTICLE | ||
|
3.4K
|
0
0 |
||
29 Sep 2025 at 8:53
Types of Fertilizers and Their Use in Farming Simulator 2022
It's time to learn a bit more about fertilizers. This is our next guide for Farming Simulator 22, where we will tell you about the different types of fertilizers and how the whole system works. It will be interesting and informative!
How the Fertilizer System Works
Let's first figure out why fertilizers are needed at all. It is thanks to fertilizers that you can significantly increase your farm's yield, so this is an important part of the game.
Crops can be fertilized twice, which is also important to know. You can apply fertilizer once right after sowing, and the second time after at least one growth stage. But there are some nuances. If you use solid or liquid manure as fertilizer, some fertilizer spreaders have a double rate function. By activating this function, you only need to fertilize once – that is sufficient.
But there is an exception. If you are fertilizing grass, one application is enough; you do not need to fertilize grass a second time. Other crops need to be fertilized twice if you are not using the double rate function.
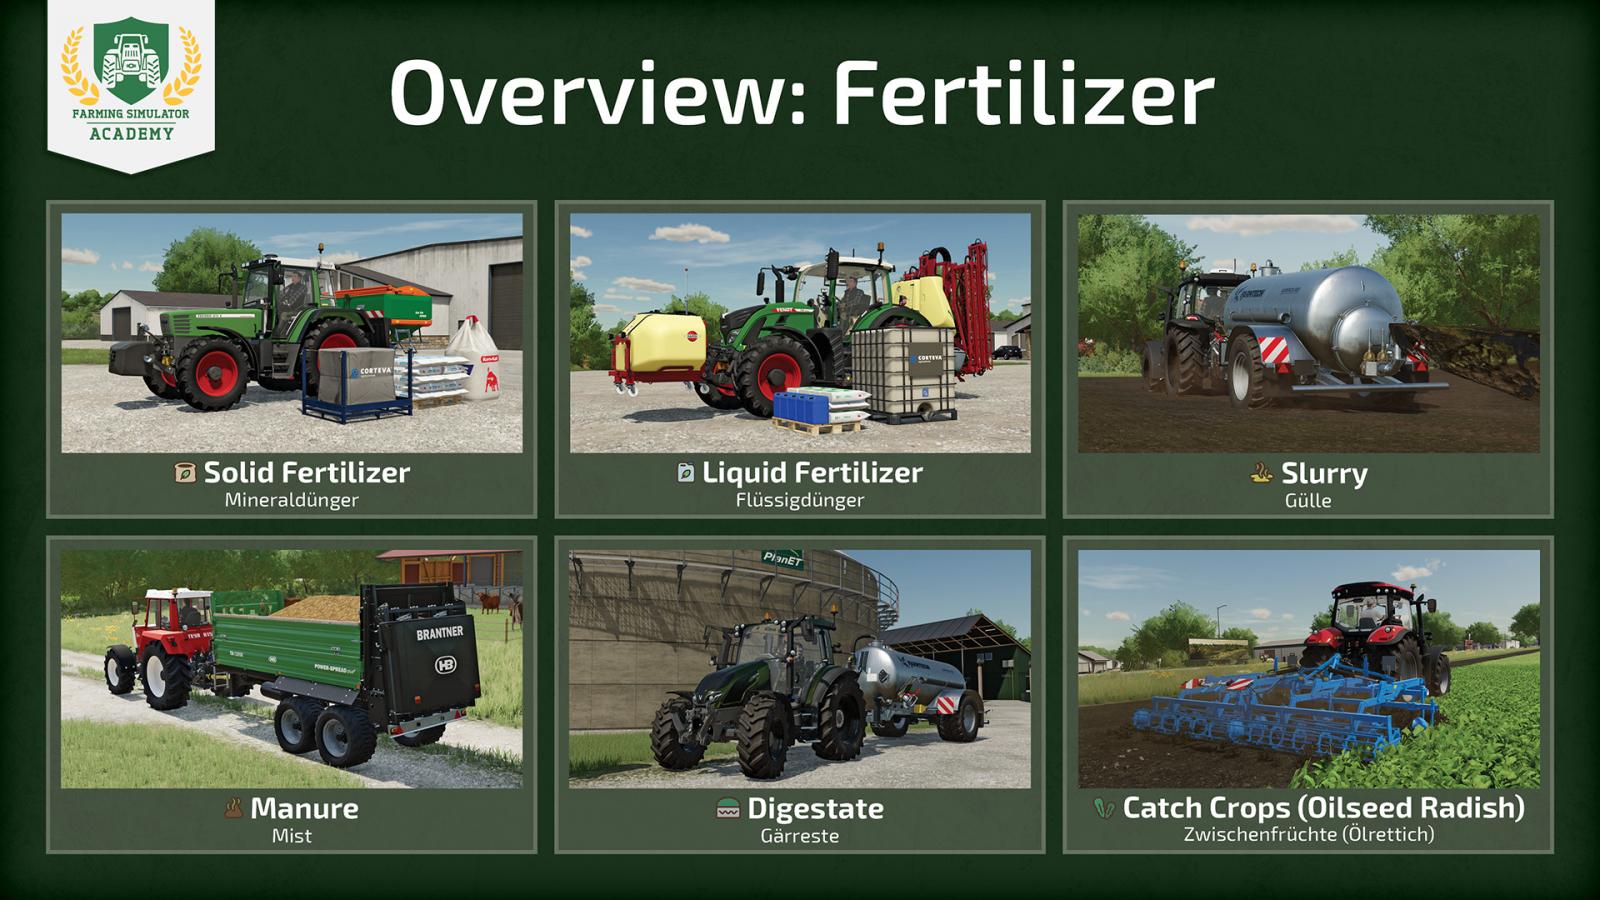
Types of Fertilizers
There are several types of fertilizers in the game, and some require special equipment. Let's look at the types of fertilizers in Farming Simulator 22.
Solid Fertilizers. A fairly common type of fertilizer. Used in combination with a regular fertilizer spreader. Since fertilizer spreaders are quite inexpensive, this is an ideal option for beginners, as you don’t need to buy a sprayer, which is much more expensive. Purchased in big bags or pallets.Liquid Fertilizers work using a sprayer rather than a fertilizer spreader. You need to buy liquid fertilizers in the Pallets category in the store. Liquid Manure is produced by your pigs and cows. This manure is stored in an underground tank. Be sure to provide your animals with fresh water to produce liquid manure. You will also need to purchase a special tank trailer for liquid manure separately. Manure is produced by the same animals (pigs and cows), and all manure goes into the manure pit. Straw bedding is required + don’t forget to provide your animals with water. Manure is applied using regular manure spreaders. You can get digestate as a byproduct when selling silage or manure at biogas plants. Digestate can be used as fertilizer, for which you will need a tank trailer just like with liquid manure.The so-called “catch crop” can also fertilize your farm. The most notable example is oil radish.
Keep in mind that manure, liquid manure, and digestate are really cheap but effective types of fertilizers, especially if you are involved in animal husbandry. Additionally, some types of fertilizer spreaders can apply lime, which also increases yield.
How the Fertilizer System Works
Let's first figure out why fertilizers are needed at all. It is thanks to fertilizers that you can significantly increase your farm's yield, so this is an important part of the game.
Crops can be fertilized twice, which is also important to know. You can apply fertilizer once right after sowing, and the second time after at least one growth stage. But there are some nuances. If you use solid or liquid manure as fertilizer, some fertilizer spreaders have a double rate function. By activating this function, you only need to fertilize once – that is sufficient.
But there is an exception. If you are fertilizing grass, one application is enough; you do not need to fertilize grass a second time. Other crops need to be fertilized twice if you are not using the double rate function.
Types of Fertilizers
There are several types of fertilizers in the game, and some require special equipment. Let's look at the types of fertilizers in Farming Simulator 22.
Solid Fertilizers. A fairly common type of fertilizer. Used in combination with a regular fertilizer spreader. Since fertilizer spreaders are quite inexpensive, this is an ideal option for beginners, as you don’t need to buy a sprayer, which is much more expensive. Purchased in big bags or pallets.Liquid Fertilizers work using a sprayer rather than a fertilizer spreader. You need to buy liquid fertilizers in the Pallets category in the store. Liquid Manure is produced by your pigs and cows. This manure is stored in an underground tank. Be sure to provide your animals with fresh water to produce liquid manure. You will also need to purchase a special tank trailer for liquid manure separately. Manure is produced by the same animals (pigs and cows), and all manure goes into the manure pit. Straw bedding is required + don’t forget to provide your animals with water. Manure is applied using regular manure spreaders. You can get digestate as a byproduct when selling silage or manure at biogas plants. Digestate can be used as fertilizer, for which you will need a tank trailer just like with liquid manure.The so-called “catch crop” can also fertilize your farm. The most notable example is oil radish.
Keep in mind that manure, liquid manure, and digestate are really cheap but effective types of fertilizers, especially if you are involved in animal husbandry. Additionally, some types of fertilizer spreaders can apply lime, which also increases yield.
|
|
ARTICLE | ||
|
2.2K
|
0
0 |
||
29 Sep 2025 at 8:52
How to Plant and Harvest Grapes in Farming Simulator 2022
Well, dear friends. It’s time to learn more about grapes. This crop was introduced in Farming Simulator 22, so not everyone knows how to plant and harvest it. Let’s find out in our little guide.
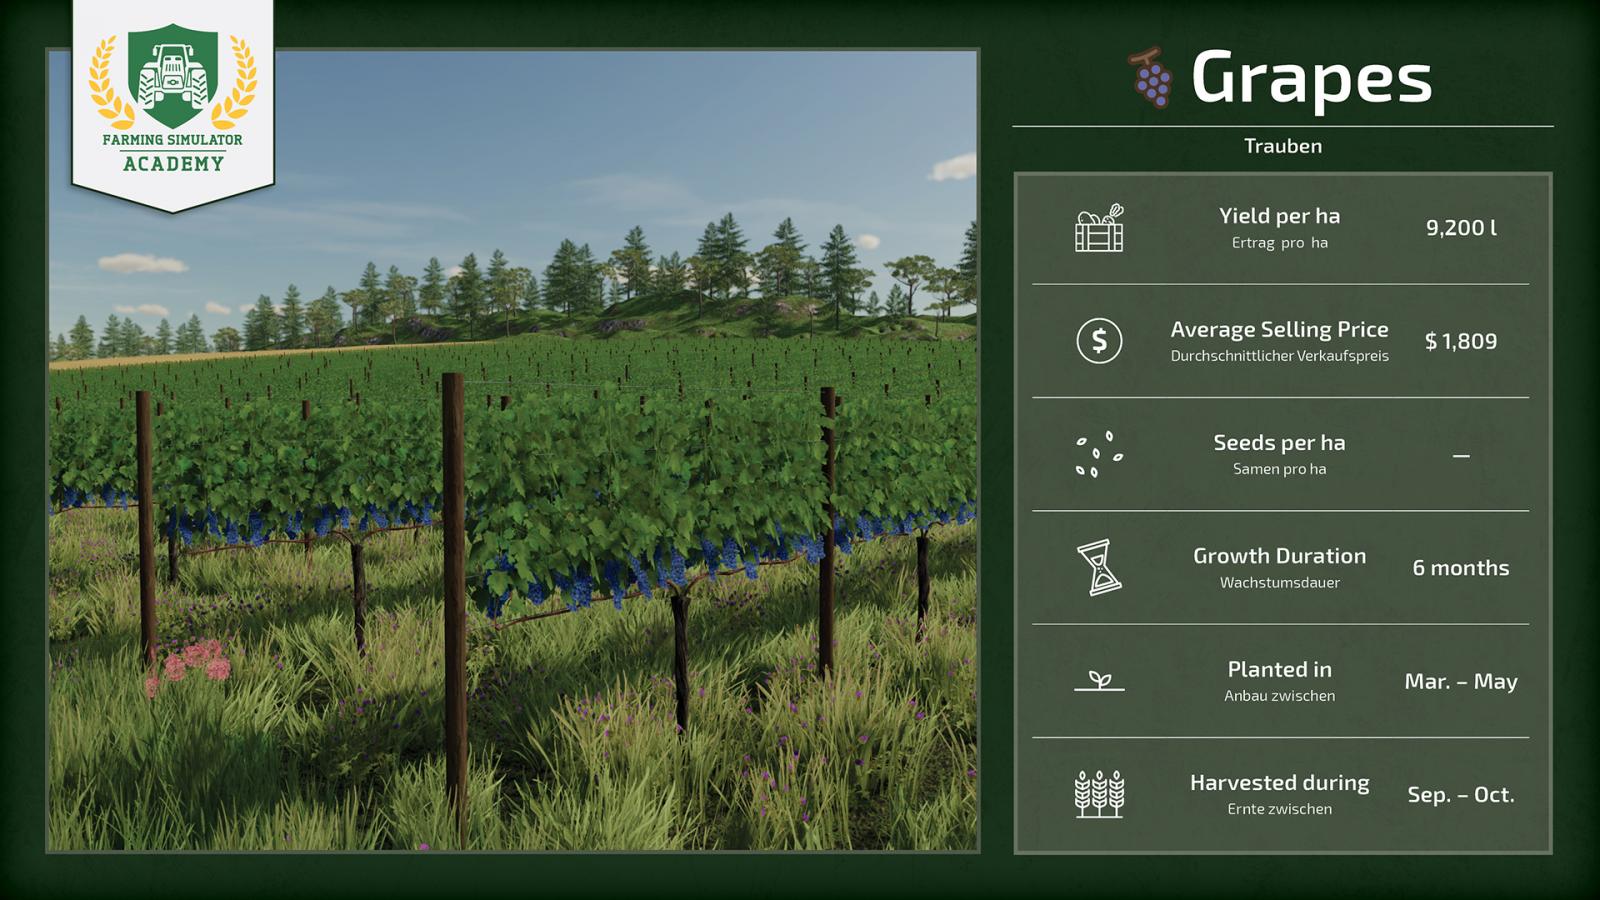
More about grapes
Let’s first figure out what is needed to grow grapes and what conditions must be met. Actually, it’s simpler than it seems. There must be a certain distance between the vines so the crop receives enough sunlight, air, and water. Naturally, this complicates the work significantly, but don’t worry – special equipment has been designed for vineyards to make your work easier. Let’s first talk about important details regarding grapes and what you will need for this crop:
First of all, choose a good open area to create your vineyard. It doesn’t have to be perfectly flat, but pick a large open space.You will definitely need a good tractor capable of attaching special implements designed for vineyards.With a special deep cultivator, you can loosen the soil between the vines.Grass and weeds can grow between the vines, which need to be cut. This can be done using special mulchers. Don’t forget to use a special fertilizer spreader to increase the yield of this crop.When the harvest appears, you will need a special harvester to collect everything.After harvesting, you must prune the leaves (using special equipment, which we will discuss below). If you don’t do this, you won’t get a new harvest.And finally – a trailer. This is obvious, you need something to transport the harvest.
Recommended equipment for this crop
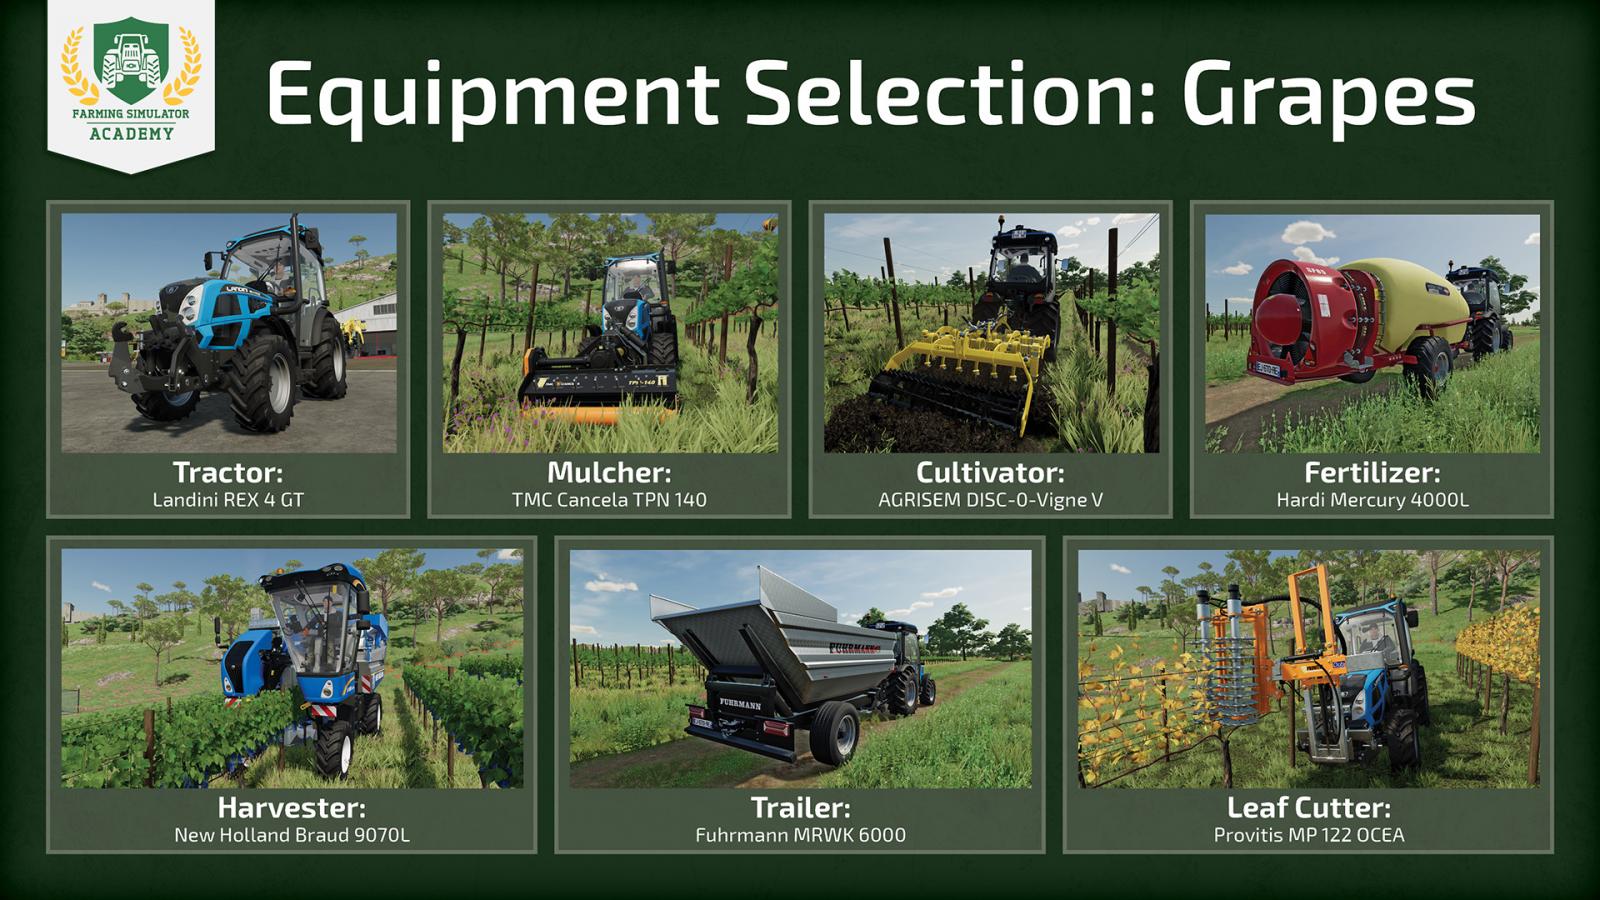
We’ve covered the basics, now let’s understand what specific equipment you should use for this crop. Keep in mind this is only a list of recommended equipment, but you have options and can use other machinery designed for this work.
A good tractor for vineyard work: Landini REX 4 GT;Among cultivators (deep cultivators), developers recommend the AGRISEM DISC-0-Vigne V;It’s time to buy a mulcher. Consider purchasing the TMC Cancela TPN 140;For harvesting, special harvesting machinery is required. Perhaps the Braud 9070L harvester will suit you?A good fertilizer spreader: Hardi Mercury 4000L;As mentioned above, a special leaf cutter is required to start getting a harvest again. The Provitis MP 122 OCEA model perfectly handles this task.And finally – a trailer. There is a wide selection here, but developers recommend starting with the Fuhrmann MRWK 6000.
Let’s get to work!
Having covered the basics and equipment, now it’s time to learn in detail how to plant grapevines, how to harvest, and generally how to manage this crop.
Step 1
Let’s start with placing the grapevines. First, choose a good spot that belongs to you. Now switch to construction mode, because this crop can only be placed this way. Keep in mind that grapevines should be planted fairly close to each other, but there must be a certain distance. You will soon get used to this, don’t worry, and construction mode shows everything as simply and clearly as possible, so the game itself will help you determine the correct spacing.
Go to the “Production” section, then to “Orchards” in construction mode. Select grapes, click anywhere on your land where you want to plant a vine. A post will be placed. Then simply drag a line across your farm and place a second post at the end – your vines will be planted between these two posts.
You can plant several such lines depending on your preferences. Keep in mind that if you play with seasonal growth, grapes can only be planted during a certain period: from March to May.
Step 2: mulching
Have you planted enough vines? Now move on to mulching. Attach your mulcher to the tractor and start removing grass between the rows of vines. Just quickly drive along each row and that’s it. This is an important process, be sure to do it.
Step 3: cultivation
The grapevines are planted quite close to each other, so using a regular cultivator is difficult. Take the deep cultivator you bought earlier and start working the soil between the vines. This will increase the amount of water and nutrients absorbed. Work row by row, but be very careful not to damage the vines. Approach the row, lower the deep cultivator, and start working.
Step 4: fertilizing
Finished soil cultivation? Now it’s time to apply fertilizer. Wait for the first growth stage, buy liquid fertilizer in the store (in big bags or pallets). You need to fill your fertilizer spreader in advance. To do this, attach the device to the tractor, approach the big bag of fertilizer, and start filling.
Done? Now head to your vineyard and carefully spread fertilizer between the rows. If you activate double fertilizer application rate on the device, you only need to drive along each row once, and everything will be fertilized 100%, cutting your work in half.
Step 5: harvesting
Great job, you have your first harvest. Now it’s time to collect it all, which is also a fairly labor-intensive process requiring special harvesting machinery. Drive your special harvester to the grapes, turn on the device, and start harvesting. Position the harvester in the center and carefully watch if the harvester is filling with grapes. If you positioned it correctly, standing right in the center and everything is collecting successfully – just drive through your vineyard and harvest all the grapes.
Step 6: selling the harvest
It’s time to sell your harvest. But first, drive up to your trailer (in our case, the trailer should be behind the harvester since unloading happens from the back). Start loading the harvest into the trailer and wait for the process to finish. That’s it, the grapes are unloaded into the trailer, move on!
Go to the price tab in the menu to see where it’s best to sell your harvest. If current prices don’t suit you – remember the production chains that allow you to make delicious juice or raisins from grapes, which sell for more than regular grapes. Make your choice and unload at the desired point.
Step 6: next harvest
Sold everything successfully? Don’t forget about your vineyards, as these vines can produce many more harvests. There is no need to plant new vines. Wait until the leaves turn yellow, then use the special leaf cutter. Attach this device to your tractor, drive between the vines, and cut the leaves to be able to get a harvest next year.
Done. Now you know how to place grapevines and harvest this crop in FS22!
More about grapes
Let’s first figure out what is needed to grow grapes and what conditions must be met. Actually, it’s simpler than it seems. There must be a certain distance between the vines so the crop receives enough sunlight, air, and water. Naturally, this complicates the work significantly, but don’t worry – special equipment has been designed for vineyards to make your work easier. Let’s first talk about important details regarding grapes and what you will need for this crop:
First of all, choose a good open area to create your vineyard. It doesn’t have to be perfectly flat, but pick a large open space.You will definitely need a good tractor capable of attaching special implements designed for vineyards.With a special deep cultivator, you can loosen the soil between the vines.Grass and weeds can grow between the vines, which need to be cut. This can be done using special mulchers. Don’t forget to use a special fertilizer spreader to increase the yield of this crop.When the harvest appears, you will need a special harvester to collect everything.After harvesting, you must prune the leaves (using special equipment, which we will discuss below). If you don’t do this, you won’t get a new harvest.And finally – a trailer. This is obvious, you need something to transport the harvest.
Recommended equipment for this crop
We’ve covered the basics, now let’s understand what specific equipment you should use for this crop. Keep in mind this is only a list of recommended equipment, but you have options and can use other machinery designed for this work.
A good tractor for vineyard work: Landini REX 4 GT;Among cultivators (deep cultivators), developers recommend the AGRISEM DISC-0-Vigne V;It’s time to buy a mulcher. Consider purchasing the TMC Cancela TPN 140;For harvesting, special harvesting machinery is required. Perhaps the Braud 9070L harvester will suit you?A good fertilizer spreader: Hardi Mercury 4000L;As mentioned above, a special leaf cutter is required to start getting a harvest again. The Provitis MP 122 OCEA model perfectly handles this task.And finally – a trailer. There is a wide selection here, but developers recommend starting with the Fuhrmann MRWK 6000.
Let’s get to work!
Having covered the basics and equipment, now it’s time to learn in detail how to plant grapevines, how to harvest, and generally how to manage this crop.
Step 1
Let’s start with placing the grapevines. First, choose a good spot that belongs to you. Now switch to construction mode, because this crop can only be placed this way. Keep in mind that grapevines should be planted fairly close to each other, but there must be a certain distance. You will soon get used to this, don’t worry, and construction mode shows everything as simply and clearly as possible, so the game itself will help you determine the correct spacing.
Go to the “Production” section, then to “Orchards” in construction mode. Select grapes, click anywhere on your land where you want to plant a vine. A post will be placed. Then simply drag a line across your farm and place a second post at the end – your vines will be planted between these two posts.
You can plant several such lines depending on your preferences. Keep in mind that if you play with seasonal growth, grapes can only be planted during a certain period: from March to May.
Step 2: mulching
Have you planted enough vines? Now move on to mulching. Attach your mulcher to the tractor and start removing grass between the rows of vines. Just quickly drive along each row and that’s it. This is an important process, be sure to do it.
Step 3: cultivation
The grapevines are planted quite close to each other, so using a regular cultivator is difficult. Take the deep cultivator you bought earlier and start working the soil between the vines. This will increase the amount of water and nutrients absorbed. Work row by row, but be very careful not to damage the vines. Approach the row, lower the deep cultivator, and start working.
Step 4: fertilizing
Finished soil cultivation? Now it’s time to apply fertilizer. Wait for the first growth stage, buy liquid fertilizer in the store (in big bags or pallets). You need to fill your fertilizer spreader in advance. To do this, attach the device to the tractor, approach the big bag of fertilizer, and start filling.
Done? Now head to your vineyard and carefully spread fertilizer between the rows. If you activate double fertilizer application rate on the device, you only need to drive along each row once, and everything will be fertilized 100%, cutting your work in half.
Step 5: harvesting
Great job, you have your first harvest. Now it’s time to collect it all, which is also a fairly labor-intensive process requiring special harvesting machinery. Drive your special harvester to the grapes, turn on the device, and start harvesting. Position the harvester in the center and carefully watch if the harvester is filling with grapes. If you positioned it correctly, standing right in the center and everything is collecting successfully – just drive through your vineyard and harvest all the grapes.
Step 6: selling the harvest
It’s time to sell your harvest. But first, drive up to your trailer (in our case, the trailer should be behind the harvester since unloading happens from the back). Start loading the harvest into the trailer and wait for the process to finish. That’s it, the grapes are unloaded into the trailer, move on!
Go to the price tab in the menu to see where it’s best to sell your harvest. If current prices don’t suit you – remember the production chains that allow you to make delicious juice or raisins from grapes, which sell for more than regular grapes. Make your choice and unload at the desired point.
Step 6: next harvest
Sold everything successfully? Don’t forget about your vineyards, as these vines can produce many more harvests. There is no need to plant new vines. Wait until the leaves turn yellow, then use the special leaf cutter. Attach this device to your tractor, drive between the vines, and cut the leaves to be able to get a harvest next year.
Done. Now you know how to place grapevines and harvest this crop in FS22!
|
|
ARTICLE | ||
|
3K
|
0
0 |
||
29 Sep 2025 at 8:51
How to Increase Crop Yield in Farming Simulator 22
So, let's learn a little more about the harvest and figure out how to increase crop yields in Farming Simulator 22. You can find the other guides on this page.
Options and Types of Yield Improvement
Increasing yield is an extremely important step in Farming Simulator 22, as your income depends directly on it. The more harvest you get, the more income you earn, which is logical. And there are several interesting ways to increase yield in the game. Let's take a closer look and examine each option.
Applying Fertilizers
Arguably, this is the most effective way to increase the yield of all crops in the game. Applying fertilizers is a mandatory step if you want to get a good harvest. In some cases, you need to go over the field twice to achieve 100% effectiveness. However, there are fertilizer spreaders that do the job perfectly and fertilize the field 100% right away, saving you time.
By the way, the game features several types of fertilizers: both solid and liquid. Solid fertilizers use a fertilizer spreader, while liquid fertilizers use sprayers. If you are involved in animal husbandry, you can use your animals' manure as fertilizer, thus saving money.
Keep in mind that you can fertilize twice, but there must be at least one growth stage of the crop between the first and second fertilization processes. There is also an interesting fertilization method – the so-called cover crop – oilseed radish, which cannot be harvested but fertilizes the field by one stage.
Weed Removal
Another equally important task is removing weeds that appear in your fields. Weeds significantly reduce your crop yields, so they must be removed. For cereals and potatoes, you will need a cultivator or hoe to remove these weeds. In other cases, you can use a weeding machine to easily clear them.
Weeds should be removed as quickly as possible. As soon as they appear – remove them immediately. This is extremely important. If you allow weeds to pass several growth stages, more expensive equipment will be required. In this case, you will need a sprayer and herbicides. However, if you decide to use a sprayer, herbicides will still reduce your farm's yield, so it’s better to remove weeds immediately to achieve maximum yield.
Lime Application
The liming process should be done after harvesting. Once you have harvested a field 2-3 times, it’s time to apply lime. Don’t worry, the field information menu will notify you when it’s time to lime the field, so you won’t miss this step!
Plowing
After harvesting root crops, you should plow. If you have harvested corn, potatoes, sugarcane, or other root crops, get rid of the roots by plowing (we will separately review plowing tools and the differences between cultivation and plowing).
Mulching
Another step not to be ignored. If stubble remains on the field after harvesting and clearing, use a mulcher and go over the field with this tool to increase the yield of the next crops.
These are the main ways to increase the yield of your crops in Farming Simulator 22!
The most popular mods
by downloads per week
by downloads per month
There are no mods yet
by downloads per week
by downloads per month
There are no mods yet
by downloads per week
by downloads per month
There are no mods yet
by downloads per week
by downloads per month
There are no mods yet
by downloads per week
by downloads per month
There are no mods yet
by downloads per week
by downloads per month
There are no mods yet
by downloads per week
by downloads per month
There are no mods yet
by downloads per week
by downloads per month
There are no mods yet
by downloads per week
by downloads per month
There are no mods yet
by downloads per week
by downloads per month
There are no mods yet
by downloads per week
by downloads per month
There are no mods yet
by downloads per week
by downloads per month
There are no mods yet
by downloads per week
by downloads per month
There are no mods yet
by downloads per week
by downloads per month
There are no mods yet